The workspace
At a glance
- Split screen: your source file on one side, your editing tools on the other, drag the middle to resize.
- The top bar carries the actions that matter across your whole template — Test, Save, Local Save, Deploy — not just the screen you're on.
- A chat assistant lives in the bottom-right corner of every screen in the workspace.
Once setup finishes, you land here — the screen you'll spend most of your time in. Everything else in this guide (entries, the graph editor, code mode, context) happens inside this workspace, in the panel on the right.
The split view
The left side always shows your source file — the same file view covered in Selecting values from the source file. The right side holds whatever you're currently working on: the entries list, the schema configuration, or an individual entry's editor.
Drag the divider between the two sides to resize them. From the top-bar menu (below) you can also switch the whole layout between side-by-side and stacked — useful if your file reads better tall than wide, or the other way around.

The top bar
The bar across the top is present on every screen in the workspace, not just this one, and carries:
The current template's name, so you always know what you're editing.
Configure — a shortcut straight to the schema configuration screen, covered in Configuring a schema.
Template selection — jump back to the template list from Choosing a domain and template without losing your place, in case you need to switch to a different template.
The file selector — a button showing your current file's name (or "Select File" if none is loaded yet). Click it to upload a new file or pick one of this template's recent files, without leaving the workspace or going back through setup — the same recent files covered in Uploading a file and configuring plugins. Switching files this way reprocesses it in the background, the same as the progress indicator below describes.
Unlike setup's file selection screen, this button only accepts one file at a time — there's no multi-file, "generalize across every file" option here, only swapping your one active file. A long file name is truncated to 40 characters with a trailing "…" so the button doesn't grow past its max width; hover it to see the full name in a tooltip. Each recent-file row in this dropdown carries its own download and delete icons too, the same as the setup screen's Recent Files list.
The actions menu (the grid icon), which holds:
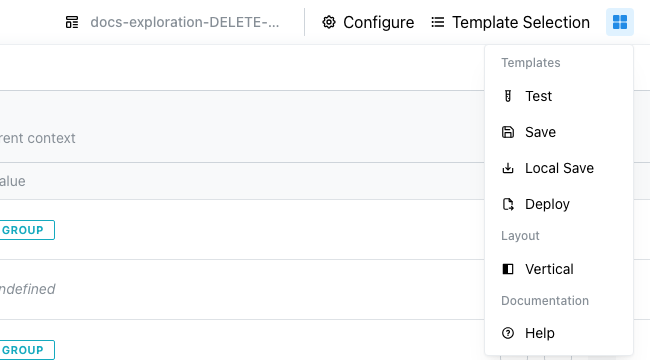
Action Effect Test Try the template against your file without saving. Save Save your progress. Local Save Export a copy to your own device. Deploy The last step; covered in Testing, saving, and deploying a template. Layout Switch between side-by-side and stacked. Help Opens MorphMapper's documentation in a new tab. A progress indicator, which appears whenever MorphMapper is re-processing your file in the background (for example, after you change a plugin setting, or switch files with the file selector above) — the same kind of progress bar you saw during setup.
Something not behaving the way you expect anywhere in the workspace? See Troubleshooting.
The chat assistant
A chat button sits in the bottom-right corner of every screen in the workspace (currently marked BETA). Opening it gives you four starting points — asking about documentation, requesting a feature, reporting a bug, or getting help with a specific mapping problem — or you can just type your own question. It keeps a history of past conversations you can come back to, and you can export any conversation as a text file. See Using the chat assistant for the full picture — history, feedback, resizing, and more.